Showing posts with label Projects. Show all posts

Monday, December 6, 2010

Done! Complete! Finished!


Good Morning!

I think I am finally heading towards the end of my Christmas projects!  Phew.  Nothing like stretching them out until right up to the mailing deadline.  I thought I would share some more before and afters.  I never remember to take photos while I am in the process, so I don't see too many tutorials coming from me in the future.  Oh well.  I am happy to answer any questions though.

I guess I'll start with the ornaments.  I started with a paper mache ornament form from Hobby Lobby, and sculpted a Santa face with using Claycrete (papier mache or paper pulp).  After it dried for a couple of days, I painted and glittered away.  Here are the two I completed:

Before


After
I also worked with paper and Styrofoam cones to make a full-sized Santas.  They take forever to dry, but the finishing process is pretty simple.  I like to use the small bottles of acrylic paint (whichever is on sale) for the detail work, and I typically seal them with a water-based satin varnish for durability and a slight shine.  I worked with more glitter than usual this year (Martha Stewart brand except for the tree Santa).  I now have glitter EVERYWHERE!


Before

After

I had hoped to get more done, but I found it really hard to work around our two rowdy dogs.  I tend to wind up working at either the dining room table or the coffee table (which is right at tail-swiping level).  Not ideal for sure.  I have got to come up with a better craft space solution!  Maybe for next year, eh?

Now I just need to get my entire house decorated and finish my shopping.  No pressure, no pressure at all.   

This post is being linked at:


Photobucket

Wednesday, December 1, 2010

Happy December!

I've been slaving away again (ha!), working on some more Santas.  It's an exciting life, I must admit.  All men, all the time...


The tree Santa, which will need some patch work (I was trying to speed up drying by putting them on a rack over a heating vent overnight.  Crack is whack, yo.), was made on a Styrofoam cone.  The other Santa was formed on a paper cone.  The paper cones are easier to work with, but I prefer the finished product I get using the Styrofoam.  


I decided to experiment this year with some paper mache ornaments I found at Hobby Lobby.  I'm hoping their faces don't dry up and fall off.  That would be bad.  Very bad.


I'm not sure that I care for this flat heart ornament.


A close-up of the cone Santa.  He might need a little patch work too.  Hopefully they will be dry enough to paint in a couple of days.

I don't know about anyone else, but I am so glad that it is finally December!  It always seems like one of those months that begins so full of promise, don't you think?  Whether or not that actually pans out is something else, but just the idea of possibilities is enough for me most years.   I still don't have any Christmas decorations out, but I figure I will be ahead of the game if I have them out before December 22nd.  I've managed to run pretty late the last few years (we were replacing flooring last year).  I will post some pictures once I get them up.  Until then, back to another afternoon with just me and my jolly men...  oh yeah.  

Wednesday, November 24, 2010

Here Comes Santa Claus

I just wanted to post a quick update on the Santas I have been working on.  I finished the first one.


And here is a reminder of what he looked like before:


Sorry about the dark picture.  It is a little dark and gloomy here this morning, but I wanted to get the picture up before I get too busy later on.  One down... 

Friday, November 19, 2010

Checking In

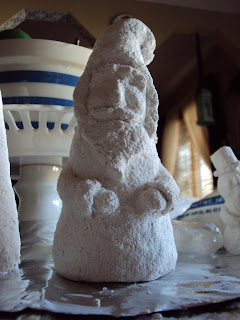
I know, I've been very quiet.  I've just had lots going on in my head lately... and I've started working on some projects.  Here is the start of the latest Santas (and a snowman for good measure):


I like to work with Styrofoam cones for the base (although you can use almost anything), and Amaco's Claycrete (paper pulp).  You just add water to the paper pulp and mix it up.  I tend to use my hands to do this even though the instructions say not to.  Then I just slap it on the cones, adding a little at a time, and smoothing it out with my fingers as I go.  Sometimes I use actual carving tools, sometimes I don't.  For these, I was working with a metal BBQ skewer and a plastic spoon because they were handy.  Whatever works is my motto.  Once you are finished with your figure, they just need to air-dry for a couple of days before they can be painted.  I'm not sure how many I will get done this year since my normally winter-dry hands are already in pretty bad shape from working with the clay.  It just seems to suck what little moisture there is right out of my hands.  I hate that.  I'd take a picture of them to share, but no one needs to see my cracked and bleeding cuticles.  Lovely, eh?  :)    

Sunday, October 24, 2010

My Handiwork


I definitely wouldn't call myself an artist.  I am just someone who makes stuff for fun.  I really like to work with crochet, decoupage, soft sculpture, paper clay, and polymer clay.  Unfortunately, I tend to give most of it away, so I don't have a lot of photos to share, but here are a few of the things I have done.


Some of the doilies I crocheted.  Call me old-fashioned.  
I don't care. 


A wish box I made for myself when I was feeling a little lost.  It did help.


A ring box and postcard box for Jeana's travel-themed wedding.


This last set of photos I will put after the jump because they are a tad risqué.  :)  I'll have to see what else I can dig up later.